tisdag 31 maj 2011

Hydrangea Endless Summer The Bride

Latin: Hydrangea macrophylla 'Blushing Bride'
Swedish: Hortensia Endless Summer The Bride
English: Blushing Bride Hydrangea

This plant is really neat even though its little brother is somewhat more special. It has though the same issues with brown flowers. I believe it has some issues with rain.

Bought this plant on Sunday 22/5-2011 at Blomstertorget in Linköping. We were though able to plant it today, Tuesday 31/5-2011 only as the garden makeover took much longer than planned. Today the sour flower bed was kind of finished. We planted it into something that was supposedly peat, which is what hydrangea should get as far as I understood. As I did not trust the guy that delivered the "peat" or whatever he called peat, we actually had a drive to Plantagen and purchased a bag of good quality peat to have in the vicinity of the roots... Better safe than sorry...

The plant looked in reality more "limish" than white really, but it was pretty neat. It was unfortunately hit hard by some very cold night, and it looked a little sad, but that did not stop us from buying it anyways. Worst case scenario, we can cut the flowers.
Height: top point 38cm (6/6-2011)
Note: 6/6-2011 -  after a week or so from planting it, it looks rather sad... :O( Flowers are kind of dried on... Will try cutting them if they do not get better
Note: On the 27/7-2011 - gave the plant a sprincle of rhododendron fertilizer. Let us see if it helps

Producer's Description
The only hydrangea that blooms the whole Summer! The Endless Summer Collection impresses by remarkable winter hardyness and untiring floweriness. Fresh buds change continually into large ball-shaped flowers until late automn.
The Bride has pure white flowers that gradually take a sweet pink blush. Ideally suited for ornament tubs, shrub borders and floral arrangements.
Flowering time: Blooms the whole summer even to late autumn

Instructions
Cutting: Remove spent flowers to encourage new blooms; in winter keep old buds to protect the plant against frost; do not cut young plants to the ground but only necessary branches to get a nice form; cut one-third of the main shoots from older plants to encourage growth.
Sun to half-shade.
Hardiness: tolerates extreme winters.

Magnolia stellata

Latin: Magnolia stellata
English: Star magnolia
Swedish: Stjärnmagnolia

We purchased a magnolia stellata some weeks ago at Blomstertorget in Linköping, but we picked it up now on Sunday 29/5-2011. Today, 31/5-2011, after having got our sour flower bed "done", we planted it. Hope it will develop. According to the description below, it should grow to a 2-4 meters high. That I really would like to see... :O) Right now it is x meters. For some strange reason, the information in Swedish says it will be around 1,5 m maximum. Very difficult to know who is right. My guess, the Swedish height will apply, my hope goes for the 2-4 meters... :o)

We planted it into something that was supposedly peat, which is what hydrangea should get as far as I understood. As I did not trust the guy that delivered the "peat" or whatever he called peat, we actually had a drive to Plantagen and purchased a bag of good quality peat to have in the vicinity of the roots... Better safe than sorry...
Height: top point 116cm (no "stem" really as you can see in the picture) (6/6-2011)

Description
(according to Floramedia) Attractive flowers on 'bare' wood. Produces a mass of fragrant tulip-shaped flowers in the early spring. Can be planted on its own or in the background of a border. The leaves turn yellow in autumn before dropping. Can grow to a height of 2 to 4 meters. Hardy shrub.
Flowers in april

Instructions
Add chalk and compost occasionally to improve growth and blossoming.
Pruning is not necessary, but dead wood should be removed.

Note though... everybody recommends peat though. Who is right? Let us see how it goes with peat. And if it does not work as wished, we will have to rethink...

Sun to half sun recommended

måndag 30 maj 2011

Cupcake decoration course

For this training, the muffins to decorate are handed by the course leader. So that part I cannot influence. The marzipan and the frosting is also handed out by the course leader, so that part I cannot influence either.
Colors are also given.

The decorating part though given the components is purely up to me.
This was the result of a "hard work".....

Scaringly ugly cupcake with an extremely ugly pink color
Exercising small star tip and making flowers....

Ugly flower cupcake
The middle is marzipan. The rest is exercising different tips...

Little less ugly cupcake
Mostly marzipan decoration. But I had to "exercise" some more on piping icing....
Rather neat cupcake (looked better in reality than on the picture)
Exercising swirl tip and trying to create some flowers with some stamps that wouldn't look like everybody else's.

Monster cupcake
This was an exercise on "grass decorating tip", which turned out was not as easy as the teacher made it look. Again, that ugly pink color could have been some other one, but well... Thought the monster was rather cute anyways... Staring at me like that....  :O)


söndag 29 maj 2011

Collaterals from a Sunday pizza baking session...

A little background
Today, I wanted to use the oregano from the our garden, so I went for home made pizza for once instead of the classical Sunday pizza from Catarì that Janne is so good at baking.
Also a good occasion to test our new baking stones.

Ingredients
1 liter water
1 tbs salt
100gr yiest
1dl olive oil
flour (can be 1,5kg, can be something else... I'll double-check tomorrow)
This gives though a far too large amount of dough:

So I do strongly recommend you to halve the quantities unless you want to "go industrial"...

Instructions
Mix water (can be cold) with half the amount of flour and all the yiest for a while. I use my Kitchen aid. Some 5 minutes give a good result.
Let the dough rest for about 45minutes-1hour.
Add oil, salt and the rest of the flour. Mix some 5 minutes again.
Let it rest some 45minutes-1hour again.
Do your pizzas...
I go the "margherita" style and simply have tomato, oregano, salt, oil mixed together and topped with mozzarella cheese.

I got bored after my first pizza and realized I could do something else instead so we made some smaller pizzas, and some different breads. Apart from the pizza, which I forgot to take a picture of as I was too hungry (looked very good though... :O) ), here is a picture of the collaterals...:
The collaterals will, of course, be frozen. To warm up, use the oven at 100degrees Celsius.

Garden makeover in progress

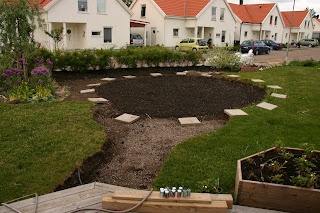
Garden makeover in progress.... Right now, it feels mostly like a pure chaos.
The kitchen view over the couch grass:
This is the future potager... There is really a ridiculous amount of couch grass in the soil. Considering throwing it all away! Really. We do not want couch grass in my vegetable cultivation....

Here it is going to become a little deck and the stones should be in the circle of course.
Hope the garden guys can put back the plates... Otherwise I will hit them real hard!!!!
Next to the neighbor, we need some bamboo to cover up the background.
The bamboo should cover up about 5m^2:

This little stone was found while digging for the bamboo plants.
The little guy was so heavy, the excavator could hardly lift it. With some major effort, it could get it out of the hole and onto some undefined place... And so was the humongous amount of (bad) soil that was dumped onto our fine rockery... :O( What to do, what to do.... Not much of a choice. But it was indeed a hurting bamboo

We did some digging in the corner towards the neighbor, too. Unsure what to plant there, but I am pretty confident, we will find something sooner or later....
Some more French blueberries needed. So some more holes are dug!
And so are some hydrangeas and some magnolias.... So more holes again...
and on the top of that the already flower bed is faaaar tooo little and needs to be expanded. More holes!
And with all those holes, a humongous amount of stones follows... Crazy....
Well, well, let us see how it all becomes!

lördag 28 maj 2011

Rhubarb cake with white chocolate chips

A little background

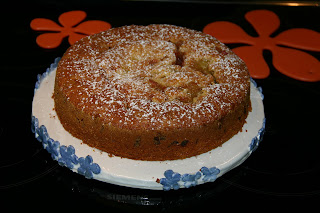
Now, after a few years, we dare picking a few stems from our rhubarb plants. Janne is responsible for baking this time! He found a recipe on the internet and modified to skip spices we do not like and added more rhubarb just to keep up the health factor (or was it as we happened to have three stems in the fridge?!?).
However it was, it tasted very good and looked neat too. Viewed from the top:
And for your information this is the way it looked inside.
And yes, the missing part was eaten within a 5 minute period by two people only.... ;O)

Ingredients

2 eggs
160gr sugar
1 tsp vanilla sugar
2 tsp baking powder
180gr flour
1dl milk
125gr melted butter

3 rhubarb stems
50gr butter
40gr sugar

70gr white chocolate chips


Instructions

Grease a cake pan and dust it with flour.
In mixer bowl, cream eggs and sugar until light anf fluffy. On the side, mix vanilla sugar, baking powder and flour well. Add the flour mixture to the creamed mixture. Also add milk and melted butter beating well after each addition.
Spread batter evenly in the prepared pan.

Peel the rhubarb stems and cut them in 1cm pieces. Melt the butter in a pan and add the rhubarb. After 1-2 minutes add sugar and cook until rhubar is soft.

Distribute the white chocolate chips on the batter and distribute the rhubarb mixture over the cake.

Bake at 190 degrees for 35-40 minutes.

lördag 21 maj 2011

Cake atmosphere....

Baking is fun. Having a platter to serve cake on can't hurt. Based on that idea, of course, it was necessary to give it a try.

Throwing seemed as the easy way to go. Plate actually got a crack at the end and after burning, it was not as straight as desired. I liked the idea though. Color of choice: blue. When the h@ll does anybody want a blue plate for a cake really? But well, nothing wrong with the color in itself. Just cannot see it go together with any cake design.... But the real problem turned out to be the fact that it was too little. For an average smaller cake with icing on, the flowers get covered to half and there is not much of a border left.


Next try needed to have a smoother color. White would be a good start. And it will have to be larger. And I would have to try to make it stay "straight".
So: Thicker, with larger diameter and in porcelaine clay. And flowers on the border instead for on the plate itself.
Result: cracked but not too much, rather ok size and straight. Flowers little delicate so a few have been broken under usage, but well... White color got too thick on some spots, but who cares. BUT! Guess what... the only available underglaze was the blue one. So the flowers became blue no matter what. Neat blue again... But but... Let us stop complaining now. To tell you the true, I think the picture below does not make justice to the plate at all.


The color is indeed whiter and the flowers brighter than they seem unfortunately.

fredag 20 maj 2011

Christmas atmosphere...

Christmas atmosphere.... Was it Christmas 2009 or 2008 even?! Sheep and Santas can't be stopped.
Made with some mixture of Cernit and Fimo I guess... it was long ago...
Here is the result. 


Some of the guys were given away to poor family members.... so they are not shown here!

Getting started with tole painting...

My friend makes the most wonderful objects painting on wood. Style is called tole painting, but Italians seem to call it Country painting. Just do not expect anybody else in the rest of the world to understand what Italians mean with it... But, well, that sometimes applies to more than tole painting...

So, now I need to get started!

First step: Purchasing material when on vacation in Italy!
Second step: Find a way to stuff all that paint in a liter transparent bag to go through security check without getting arrested for whatever illegal activity....
Third step: Forgot the brushes in the hand luggage can seemingly also upset security personnel... Very pointy, or so it seems...

Forth step: Paint something... Well... Maybe I should have purchased something more than only brown variations? Mh... Let us wait for some more inspiration. Now I am at least well set when it comes to brushes...

Easter atmosphere...

Easter implies chick'ns and chicks... So here we are... used a mixture of Fimo and Cernit. It seems not to be an ideal combination as it does not stick together completely. Had to glue the crest of the larger chick'n as it fell off...

Anyways, here is the whole family of chick'ns... 2 larger chick'ns and 2 chicks.

Needed a place to stay, so created a dotted porcelaine clay vase formed as a flower for them and suitable platforms formed like heart and eggs. 

Cultivation of grass started also. Not very easy to keep the right amount of water. Either too dry or too wet. But the grass seems to survive some beating up. Grass goes tough on small chicks too... 

Dotting around...

Making perfect square vases takes time, time and patient I do not have. It has to be quick! Quick can become charming somehow, can't it? 

Found a good clay called porcellaine clay. Becomes rather white by itself. Has got a very special texture and does not really like being bent. It cracks then... Little tricky as square vases (even the charming ones, read "not perfectly square"...) require some kind of 90 degree angle, which falls into the "too bent" when it goes into the porcellaine clay field.

Dots, lilac to start with... It resulted in three rather similar and rather small vases. Two of those for growing spices without holes at the bottom and one, with the same purpose, but with holes in the bottom and a plate under.

Winter term 2008 #4 Dotted vase without holes
Mixed lilac and purple underglaze. Turned out, well, a mixture of lilac and purple.... White shiny glaze on the top of it.

Spice vase demand fulfilled by offer. Found some neat stone candles at Finnish "crap store" that needed a plate. So here is the result. 


On one of these, I went wild and decided to go for lines instead of dots....


Bad choice not to be repeated :O(

Even offer for stone candle plates started to surpass demand. Next need: spoon holder for my cooking activities. 

Winter term 2010 - Cooking spoon holders
Winter term 2010 - Cooking spoon holders from the side
Made actually 3, but I gave one to daddy for Christmas (imagine his happiness, poor guy...). There the purpose was explained to be as a "tea ball holder". But, well, whatever you call it, it looked pretty much the same as the other two. All of these were also made with porcelaine clay, though the dots were done with purple. More than purple it looked like blue, but well... Lilac was not available any longer so no choice... :O(

This term I went big... likely the largest project done in the world with porcelaine clay. :O) Crazy idea.... Big vase is needed though for my basil cultivation! And classifying as a spice, it needs to land into a vase with dots as any other spice. Hadn't even started closing up the vase, a cascade of cracks started appearing. Not being the precise type, patched them somehow as quick as I could (booooring!). HHU! Big stuff!
After having dried it cracked. It did not look like critical cracks as they were on the inside. Didn't even bother to think about patching those in the hope glaze will do wonders...
Glaze... yes... try to glaze such a humongous vase without any "spraying" option. Result is doubtful, but what would be the option? Delayed the glazing part until the end but now my basil requires a bigger vase so... 

And both lilac and purple underglaze are out.... Mixed leaf green with yellow instead...
Spring term 2011
Easter has been on too... Did a blooming dotty vase (= vase formed as a flower with dots). Here again porcelaine clay. Here again... a lot of corners indeed. Cracking expected. But it did surprisingly only get 1 crack. Nice teacher repaired it. Me too lazy.... Had to use the mixed leaf green and yellow underglaze as my favorite option not available any longer. It is supposedly hard to buy underglaze. :O( Had to make chickens with lilac colored dots instead to keep the dots balance stable... (see coming post!)
Spring term 2011
And, as the vase was supposed to be filled with gras, the chick'ns had to rest on something. One heart for the two larger chick'ns was best and for the chicks of course two egg-formed platforms.

tisdag 17 maj 2011

Blooming around....

I got this idea about using brown clay that, without any glaze at all. It turned out to look like a ginger bread cookie. So here everything started. The idea of having light clay for the main object and with beige glaze decorated with brown clay without any glaze started.

At the same time, the need for flower vases increased and the idea of throw did not appeal to me given the previous terrible results. Rolling out the clay seemed like a better alternative. Straight vases were a little too boring and I had already done similar vases, so I thought I might do some with a more "original" form.

The results can be seen in the coming pictures. These vases have been done in different terms and as I liked the idea and I needed more matching vases in different sizes, there are quite a few.

This must have been the first of a series and is about xx cm tall. It fits tight 7 tulips. Probably, 2 more cm in diameter would have made miracles for the 10-tulip bouquets you can get at the supermarket... But well...

[Imagine here my long stemmed vase.... Will try to take a picture of it as soon as I localize it...]

The next try was much higher and thinner. It was supposed to have a lot more of flowers all the way, but, as usual, I was too lazy and did not "rub" the back of them enough so they fell off. Anyways, the fallen flowers turned out to be rather useful in other projects. More suitable for a few long stem flowers. Question is, "when do I ever purchase such bouquets? Well, let me see what the garden gives me this year....

If flowers, why not hearts for my big heart!
 It looks much larger than it is. It is no more than 10cm tall.It is used as a money container.

I made a similar one for myself, but with flowers again for my pens. But for some reason, it seems to have gone up in smoke from my desk. Picture coming whenever it returns home....

These guys still did not fulfill all my needs. I needed a vase for my flesh-eating plant and a rather big one for my decorative woods. So here they come. These guys are much larger: xx cm and xx cm.
 The flowers, do not ask me why, turned out to be of a different clay, which was lighter and with dots (wtf... :O( ), but, well, I have gotten used to it in the meantime and it was ok. The "smaller" one turned out to be too big for my flesh-eating plant anyways and now the plant has dried out anyways (too little insects in the winter, they say...)

My idea was to make a tulip vase as any tulip vase. That is not straight but rather wavy. As I could not really decide on the wave form exactly, the project has not gone through yet. Risk is high that it never will...

Anyways, all of a sudden, I got an urge to throw... as usual, I cannot really accept I cannot do something. So even though I am very very poor at it and have been "throwing" away a lot of things (hehe... what a strange mixup of words...) and the amount of "mashed" clay was amazingly high, I gave it a further try.
Main purpose here was to make a cup for my daddy.
 An air bubble came into it somewhere. And I came out with the less brilliant idea of wetting the border. So a crack came in. The flowers were mostly a reparation for the crack. Turned out neat though I personally think. Glaze is nearly finished though, so it is very thin unfortunately....

Now it looks bad though: the beige glaze seems to be out and no new coming.... Desperation!

måndag 16 maj 2011

Everyday cream cheese frosting

A little background
Cream cheese frosting normally contains butter. As I actually love cream cheese frosting and I'd really love to eat it for dinner every second day (but, of course, I don't...) I have tried to do it a little more "light". No butter or fat added.
This frosting is though not really usable for cake decorating as it might be a little too soft. It works fine for some simple, unpretentious swirls on cupcakes. Which is shown in the picture, of course. It is up to you to judge if it is nice enough or not...
Ingredients
150 gr Cream cheese
70gr confectioner's sugar (or maybe more... I mostly just mix "more" sugar in until it looks neat, has the desired consistency and, of course, the right taste)
1 tbs lemon juice

Note: I personally think the amounts above give a good result!

Instructions
Whisk together the cream cheese with the confectioner's sugar until very fluffy. It can take some time indeed! Add the lemon juice and whisk some more. Here you go! Taste and if it does not look right or taste right, just add more sugar or lemon juice depending on the needs. Use your senses :O)

If you are up to it, you can, of course, use coloring gel to give the frosting some color. Here, I took a toothpick and dipped it about 1cm in red gel. This was the result: a very bright pink color.

White Chocolate Chip Muffins

A little background
This recipe originates from a classical Swedish book called Sju sorters kakor where the original name of the cake was Muffins med Frukt (Muffins with fruit) and actually contained raisins and candied orange skins. Unfortunately, this recipe has been removed from their latest edition, so this is for all of you that have been deprived by this wonderful recipe and purchased your book too late. Or even never have had the chanse to own one at all. 

The white chocolate chips will kind of disappear in the muffin, but the taste will be much better than for the regular batter without them.
If you want to feel the taste of the white chocolate chips, you might want to put some few additional chips in the middle of the muffin. You might as well decide to fill it with milk chocolate or even Nutella. I am not a fan of chocolate (you read right!!!), but these small guys are real killers!!! Difficult to stop.
You can freeze them if you desire or even cover them with cream cheese frosting. For a lighter version, see Everyday cream cheese frosting.


This is how it looked like with frosting. I personally always make very small cupcakes, so I can eat them in a few bites and the frosting to muffin ratio becomes somewhat higher. :O) Only problem is you need more than one small muffin plate to use up the whole batter... But well... What you do not do to get the right size... Hehe...

Ingredients
125 gr butter
170 gr sugar
2 eggs
1 tsp vanilla sugar
270 gr flour
2 tsp baking powder
1,5 dl milk
2 dl white Chocolate chips

Instructions
Turn on the oven at 200 (180) degrees (with ventilation)
Butter muffin pans in advance so they are ready when the cake mixture is.

In mixer bowl, cream butter and sugar until light and fluffy. Add eggs one at a time, mixing well after each addition. Mix in vanilla sugar. Mix flour with baking powder. Add flour mixture alternately with milk, starting with the flour; mix well but slowly. Add the white chocolate chips. Pour into muffin pans.

Make sure that the chocolate chips do not surface as they will kind of burn otherwise.

lördag 14 maj 2011

Plan A

Here we go! Let us start by taking pictures of all projects now! Need to start somewhere, right??