måndag 29 augusti 2011

Rhododendron Catawbiense 'Grandiflorum'

Latin: Rhododendron Catawbiense 'Grandiflorum'
Swedish: Parkrododendron
English: Rhododendron Catawbiense 'Grandiflorum'
Purchased at Plantagen quite a few years ago

7/6-2011

This plant requires sour soil and is therefore to be planted in peat. At the beginning we actually dug a hole and filled it with peat only. Reading about this plant, you are supposed to really only have peat in the area.
7/6-2011
And the hole should also be rather large, otherwise the plant will grow well until the roots reach the "normal soil" and then stop feeling well. Which is more or less what happened here.

One other issue with this plant (and also this I found out the hard way) is that you really have to water it properly in Spring time. Being an evergreen plant that never looses its leaves, it has quite a large area (all the leaves) to evaporate water through. When it is not humid in the ground and maybe also is rather frozen in the soil, the sun will burn the leaves and for that matter also the blossoms/potential blossoms.
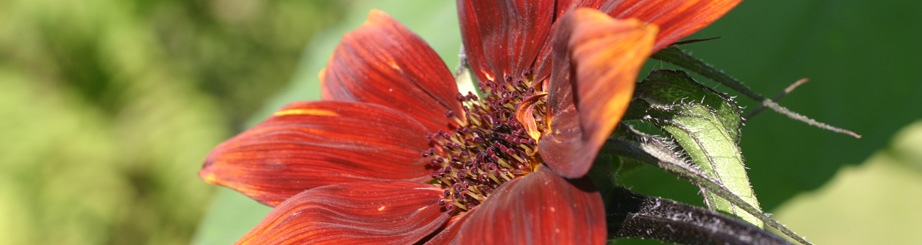
This year only a few rather small blossoms bloomed. But it was never how it should be. This is when the shrub had its maximum period of flowering this Spring. Not much indeed.
31/5-2011
I will try again next year with watering at an earlier stage of the Spring. A lot of sources recommend covering the leaves with tissue to avoid evaporation. I personally do not feel it looks very good so I do hope watering will do it.

2/7-2011
This year we have actually refurbished the area around the rhododendron as we felt it was not very practical as it was. The grass (especially the couch grass) could not keep away and grew in together with the plant all the time. In a few days after removal, it was there again. Furthermore, it is said that grass takes away nutrition from the plant itself. So we decided to do a whole flower bed for peat plants. We removed a whole deal of ground and refilled it with peat. The plant seems to have recharged its powers since then. Maybe with good watering, we'll have some enjoyable blooming next year?!

Producer's information
Normal watering and fertilizing
Distance to other plants: 3m
Height: 2,5m
Prefers half shady to shady location.
Blooms in May-June
Winter hardy up to Swedish zone 5

tisdag 23 augusti 2011

Dahlia 'Catherine Deneuve'

Latin: Dahlia 'Catherine Deneuve'
Swedish: Dahlia 'Catherine Deneuve'
English: Dahlia 'Catherine Deneuve'

This dahlia is one of the most lovely dahlias I have seen. It lights up the place. Really no kidding.
14/8-2011

We have now had it two years in a row, that is we purchased it twice.
Last year, 2010, it gave very large amounts of flowers and it lighted up my Automn. It really even survived the first frost until October. It was a pleasure to see it.

This year, 2011, I was forced to purchase a new bulb as I enjoyed last year's so much. I am though not sure why: it might depend on the fact that it does not have enough space, or it might simply be that it was not its year. Or maybe I put it outside too early. Though the current amount of flowers is far from satisfactory: there are a lot of blossoms, but they haven't developed to flowers yet. So far we have only seen one only flower at the time. Still lighting up my everyday routine, but I wish more flowers were to come.

Product description
Single orange flowers (8 cm. across) and beautiful dark foliage, height 80 cm.

Dahlia Gallery Matisse Purple

Latin: Dahlia "Gallery Matisse Purple"
Swedish: Dahlia "Gallery Matisse Purple"
English: Dahlia "Gallery Matisse Purple"

14/8-2011
This dahlia is a tricky one. She will though land again on my purchase list: the flowers, even though not even near to what they looked like in the catalog are very beautiful, colourful and happy. Well, why tricky, you might wonder. The answer is easy! It is the only dahlia whose flowers actually grow under the leaves... So if you want to see them, you'll need to do serious research... under all those leaves. It is very small compared to other dahlias. Right now it has maybe around 2-3 flowers but there are more to come... somewhere under all those leaves... :O)


Producer's description
rather large (13 cm. Ø) orange flowers, height only 30 cm. Purple colour.

söndag 21 augusti 2011

Ficus carica 'Brown Turkey'

Latin: Ficus carica 'Brown Turkey'
Swedish: Fikon 'Brown Turkey'
English: Fig 'Brown Turkey'
Purchased from Graines Baumaux spring 2010 by post order.

21/8-2011

The description gave a very positive impression of the fruit. And as it seemed to be giving very good figs as well as being suitable for containers and cold areas, we ordered it. It arrived with 2 figs on it. Both of them fell off while trying to "replant" the guy. We purchased a rather large pot and let us see how far it is enough.
I do not believe the plant can stand outside in wintertime in Sweden so it still needs to have an acceptably light pot so we can move it around.
In 2010 the first figs were gone but quite a few more came back. Unfortunately all of them far too late. The winter came and they never became ripe. In Automn we covered it with a little "plastic house" and wrapped the pot in bubble plastic. It looses all leaves in Automn. But in Winter, we put it in Jannes parents garage that was supposed to keep over 0 degrees but not much higher. The garage did not have any windows but theoretically the plant does not need windows when it does not have any leaves. Indeed it survived. We took it back in March or April again and placed it on the Southern side of the house against the house wall. I removed the figs that were on, maybe it was not necessary or maybe it was even a bad idea? Unsure. Next year, I'll leave them there if there are any and see where this leads us. It is never too late to remove them if it turns out to be a bad idea.
21/5-2011

The plant has grown and has given more branches. The size has increased also, but it is still rather small.
21/7-2011

Today we ate our first fig ever: it was very very sweet and very tasty.
21/8-2011

21/8-2011

The figs you normally buy around here taste like nothing compared to our first fig from our little plant! It was not very big, but it was very good!!!! Maybe not like a real Italian 10cm fig, but I am very happy anyways! Two more are about to become ripe.

21/8-2011
And quite a few more are to be seen on the plant, but they are far from large or ripe unfortunately.
26/7-2011

14/6-2011

Hope they will make it before Winter comes. It is very special though to see a plant without any leaves but with figs on it. Funny!

Producer's information
In catalogue: It produces fruits twice a year: once at the end of July/beginning of August and once in September/october. The fruits are formed as a pear, with a colour going from golden to brown (40/45 grams). The meat is read. It is the fig plant that is supposed to be most resistent to cold and is recommended for the Northern and Eastern areas (My little note: of France, of course.... Do not think this applies to Sweden). It is perfectly suited to be grown in containers.


On the tag: Place in a sunny position. Gives big and juicy fruits. Ripe for picking: July-August. Trim: March. Height approximately 150cm.

fredag 19 augusti 2011

Pyrus salicifolia maybe...

Latin: Pyrus salicifolia maybe...
Swedish: Silverpäron
English: Willow-leafed Pear, Willowleaf Pear, Weeping Pear
Purchased probably in 2009 at Blomstertorget

We purchased this tree as a grown tree as we wanted to have a tree from the beginning and not start from a small thing. It was rather expensive and not easy to transport, but it got home and we created a flower bed around it to crown it.


8/7-2009
The stem was nearly 2 meters but it was not very thick. We had to use three stocks to stabilize the tree.
The tree looses all its leaves during winter time but it can become very beautiful anyways when the snow freezes the branches.
30/12-2009
In two years time, the stem has not grown in length as I think it is not supposed to as I have understood it, but it has become thicker and we are considering removing the stocks now.
Also the amounts of branches has increased.
21/5-2011
Personally, I felt like it was "weeping" too much so I came up with the idea of cutting the branches so that the growth will go upwards. The idea was good but I did it too far down. Will repeat the process later in September but starting further up. Let us see if it becomes beautiful then. I have some picture in my head about how it should look. The idea is to get it grow in width rather than downwards.
This tree gives beautiful white flowers in spring, but they are not very visible from far as the leaves are green-grey. In July-August, it gives unedible (really, unedible, I tried) small pears.
6/8-2011

6/8-2011


lördag 13 augusti 2011

Less than a two-day absence....

... does miracles.... Yesterday, we left for a short trip to Stockholm with mom and dad and when we came back, things had changed in the garden... :O)

More strawberries were ready to eat and more blueberries from our favorite blueberry plant. Not a surprise... But:
  • two very large blueberries were spotted on the one blueberry plant that did not seem to give any blueberries for this year
  • the "wild strawberries" had grown to a huge amount and some of them to a size of nearly 3 cm...
  • the rhododendron Cunningam White had bloomed (!!!) again. Please note it is the 13th of August...
  • the newest miniature rhododendron has bloomed (!!!), too.
  • The first Dahlia Catherine Deneuve has bloomed.
  • The Dahlia Honka surprise has given 2 more flowers and there seem to be quite a few more on their way 
  • The dahlia in the hosta flower bed has now two neat flowers
  • Nearly all sunflowers have now flowers (yesterday, there were only 2...)
  • The roses had bloomed again (at least two of the white ones, but also the orange one)
  • Nearly all nigellas have bloomed now
  • At least 3-4 tomatoes were spotted on the green tomato plant outside!
  • I spotted beetroots sticking out of the ground
  • The salad, which we have been eating 4 people from the last 10 days, seems to be increased to a humongous amount...
Am I forgetting something?! Hehe... Coool!!!!!

torsdag 11 augusti 2011

Sedum oreganum

Latin: Sedum oreganum
Swedish: Oregonfetknopp
English: Oregon Stonecrop
Purchased at Blomstertorget 6/8-2011

Now where the rockery is nearly on place, we were out looking for what plants that are available for rockeries and saw this plant. It was very "little", but promising so we purchased 2. And not to underestimate the value of the sticker picture... :O) Let see if it holds the promise in reality, too.
6/8-2011

Producer's description
Dark red-green, fat rosettes that spread to low, thick, winter green carpets about 5cm high. It blooms in July and August with yellow flowers of about 10cm. It prefers well-drained, dry places. It is very resistant to lack of water. It is well suited for rockeries, very dry slopes, walls, etc.


Brasato

This is a typical Italian dish that my grandmom used to do on Sundays and we used to eat it together with Polenta.
This is not the traditional recipe, but something that tastes and smells pretty much alike and has very similar ingredients.
Ingredients
3 teaspoons oil
25gr butter  (but if you ask Mom, you'll have to at least double the amount of all mentioned fat :O) )
1/2 carrot
1/2 celery stalk
5-6 leaves of sage
3-4 small pieces of rosmary
500gr small steak onions (originally, the flat onces should be used, not available at ICA though)
3 cans of mashed tomatoes
500gr prime rib (Swedish: Högrev)
1 solo garlic
1 can of water
1 teaspoon salt
2,5dl red wine

Instructions
Grate the carrot and the celery stalk. Do holes in the meat and chunk in sage, rosemary, garlic in them. Salt (and pepper if you wish. I don't). Put carrot, celery and possibly sage and rosemary if you haven't chunked it all in the meat already in the oil and butter. Let it go slowly so that the fat catches taste. Brown the meat in it. Put onions in. Through the wine in and let the alcohol evaporate a little.

Put everything in a croc pot including the tomatoes and the water and let it cook for about 6 hours starting with 3-4 hours high heat and the rest low heat. Grandmom would actually cook it in a pot for 2-3 hours instead. Of course, Grandmoms tastes better, but I am not sure what more magic she did on the stove. :O)

Actually, I did brown meat first and put it in the crocpot and then reused the fat for the onions. That worked fine, too.

I do recommend to eat it with sliced hot polenta and gorgonzola.

Lemon Pie


A little background

Not sure why, but I got really into eating lemon pie. Nothing that usually happens to me. It was mom's exam party and we needed a dessert anyways. Found a recipe on Tasteline. Following it gave a rather weird result: the crust mixture became too dry and crumby and it was far too much for one pie. Actually, I managed to do two pies with it and still have too much in each and have mixture left to do cookies with. So this is the modified recipe I will follow next time I bake this pie. This version serves 6 people well after a well-fed dinner. There won't be anything left though... :O)
6/8-2011

Crust
50gr sugar
1 good teaspoon vanilla sugar
120gr flour
100gr butter
1 egg yolk
1 good teaspoon lemon zest

Filling
For those that desire a lot of filling look at the numbers in parenthesis instead...

2 tablespoons lemon juice (3 tablespoons)
1 teaspoon lemon zest (1 good one)
80gr sugar (120gr)
40gr flour (60gr)
2 eggs (3 eggs)

Instructions
Mix sugar, vanilla sugar, lemon zest and flour in a bowl. Add butter and yolks and mix. I used my KitchenAid with the blender tool.
Butter a pie mold and distribute the mixture in it evenly. Put in refrigerator for 30 minutes.
If you desire to have a perfect cake, you might want to use e.g. cheek peas to bake the crust: put aluminium foil on the crust, put 300gr cheek peas in it and bake for 10 minutes at 200degrees. I skipped that part as such fuzz bores me, but I am pretty sure you get neater results if you do.
Whip eggs for the filling with sugar until fluffy. Add flour, zest and juice and whip some more.
Put the filling in the pre-baked crust and bake for some 15 more minutes at the lowest level in the oven to avoid the pie to burn.
According to the original recipe the pie should rest over night in the refrigerator. I did not really saw this until I had already eaten the pie, and I can tell that the not that cold version was very good anyways.

I served it with blueberries and raspberries at the top and sprinkled some confectioner's sugar at the top.
6/8-2011
Tasted great to be a lemon pie really!

onsdag 10 augusti 2011

Pinus mugo 'Gnom'

Latin: Pinus mugo 'Gnom'

I once saw at a plant shop the most amazing tree. It was a Pinus mugo 'Gnom' over 1 meter tall and pruned to give it a very exotic look. Only downside that stopped me was the price. After some time I saw a little plant of the same kind and had to purchase it. I would let it grow myself and take care of the pruning myself.
So home we went with this little guy and planted it towards the neighbors border as it would contrast wonderfully with the white garage of the neighbor.
7/6-2011
Little downside to it: I do not have the heart to actually prune it in reality. Only a few cuts have been carried out so far, but a few though is more than nothing... :O) The plan is though to keep a maximum of three branches on each round of branches. Each second round, I might either cut or keep 3 branches but turned in a different way compared to the ones below.

In the meantime, the neighbor planted some hedge on their own and the tree kind of disappears with that background, sadly enough.

The tree has kind of doubled its size since we purchased it, but is still a little cute tree.
2/7-2011
We even spotted one cone on it this year :O) Neat! We have used fertilizer for conifers, which kind of gave it a growing boost. I believe it kind of enjoys water, too. The less it rains the less it thrives.

Producer's description
Shiny dark green, long needles. Buds are very decorative. Ball-shaped, very dense, up to 3 m high and wide.
Tolerates frost.
 
Producer's instructions
Soak plant in water before planting. Dig hole of twice the width and depth of the ball. Insert plant and fill up with soil. Water well after planting.
Enjoys sunny position and has no specific soil needs. Normal rain is sufficient. Use customary commercial fertilizers in spring and summer. It needs no pruning and requires no special care.

tisdag 9 augusti 2011

Tulip Maureen


This is a very beautiful tulip: long stemmed, with a clean white colour.
21/5-2011
It is though as any tulip very tasty for bunnies and bambies so it can be a good idea to protect them with some stinky substance that keeps those guys away.
These were presents from Janne, but I guess he purchased those at Schiphol Airport. I got them twice (actually three times, but I happened not to plant them correctly the last time - or actually not at all as it snowed before I made it). The first time I put them in the grass. That is not a really good idea as you are not supposed to cut them away until the leaves have become yellow and that impedes grass mowing for a far too long time. Plus if you have a robot mower, it will cut them when they are in bloom  :O(((( The other bunch was put in a specific bed, which was much smarter indeed. We'll have though to refurbish the bed as it has become rather "crappy".

måndag 8 augusti 2011

Polenta

When I was little, I used to eat polenta nearly every Sunday lunch with brasato that grandmom used to cook. That was a real tradition. As you were supposed to continuously stir the polenta while cooking it in a copper calderon for around 45 minutes, the whole family made turns to cover up the long 45 minutes.

Now the world has developed and with the caldron you also have a stirring device, so no manual stirring is required any longer. I got to take over the copper caldron as my parents do not use it as often any longer.


So today we tried to cook the "original Italian Polenta" in a Swedish kitchen with a copper caldron. With stirring device:
Polenta in copper caldron - 8/8-2011
Ingredients (per person)
100gr Old style polenta flour (the grounding is rough)
4dl water
1ml salt

Instructions
Cook the water. Add the salt. Stir for 30-40 minutes depending on the flour cooking instructions. If it says less than that, you probably have some strange precooked type of meal that does not give the perfect results.
Heat should be slow, but the polenta should bubble at least once every few seconds.
It is done when tilting the pot yields the meal to separate itself from the pot.
Do not worry if a patina builds up around the pot. It is also normal that it burns lightly.

Serving
Serve it hot with brasato and with gorgonzola. I normally slice up polenta, put gorgonzola on it which leads to obvious melting and add some brasato sauce. I then pile up more slices that way and eat!